


We’ve all been there—frantically searching for that one item you just know is hiding somewhere in your home. Whether it’s a favorite pair of headphones or your child’s lunchbox, the struggle to keep personal items organized can be frustrating. The chaos often leads to wasted time and unnecessary stress. What if there was a simple solution? Enter name labels! These handy little tags can transform how you keep track of your belongings, making them easy to find when you need them most. Let’s explore how name labels can bring order back into your life and save you from those frantic searches!
The benefits of using name labels for personal items
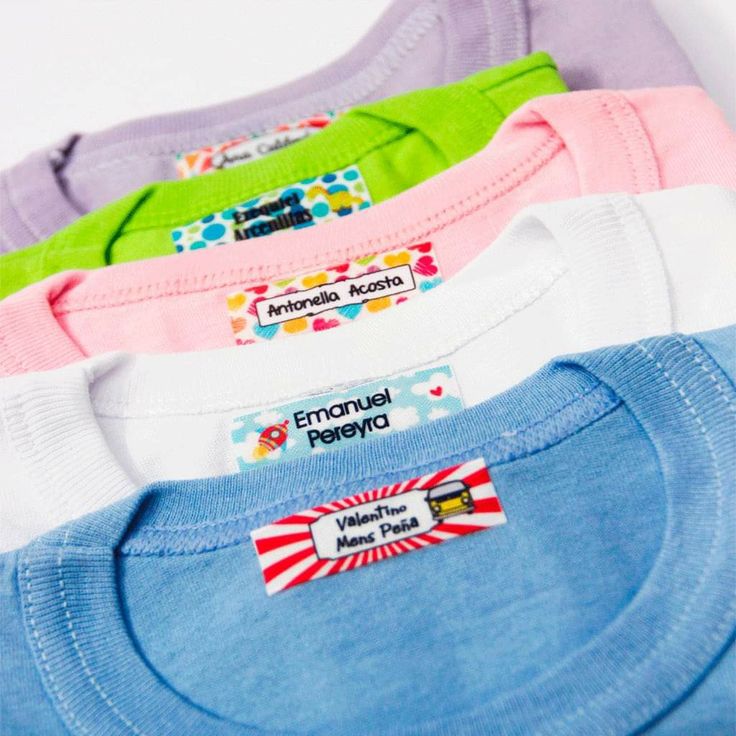
mini name labels offer a simple solution to the chaos of misplaced belongings. By clearly identifying personal items, they eliminate confusion and save time when searching for essentials.
With name labels, you can customize your organization system. Whether it’s for school supplies, sports gear, or kitchen tools, each item has its own designated spot. This not only enhances orderliness but also fosters responsibility in children as they learn to keep track of their possessions.
Moreover, name labels reduce the risk of losing valuable items. Kids at school or adults at work are less likely to misplace things when everything is tagged with a familiar name.
Labels can also add a touch of personality and creativity to ordinary objects. Choose fun colors and fonts that reflect your style or interests; this transforms essential items into unique expressions of individuality.
Different types of name labels and their uses
Name labels come in various styles, each serving a unique purpose. Fabric labels are perfect for clothing and other textiles. They withstand washing and wear, ensuring your items stay identifiable.
For school supplies, you can’t go wrong with durable vinyl stickers. These waterproof labels stick to notebooks, lunch boxes, and backpacks without peeling off over time.
If you’re organizing kitchen items or storage bins, consider clear adhesive labels. They make it easy to see what’s inside while keeping everything neat.
For kids’ toys or shared spaces at home, colorful name tags can add a fun touch while promoting responsibility.
Magnetic name labels are great for filing cabinets or metal surfaces. You can easily reposition them as needed without any damage to the surface underneath. Each type of label offers functionality tailored to different needs!
Creative ways to use name labels in everyday life
Name labels can transform the mundane into something organized and fun. Consider using them on your children’s lunch boxes. It ensures their meals don’t end up in someone else’s hands.
You can also personalize school supplies. Labeling notebooks, folders, and even art kits helps kids find their items quickly, fostering independence.
For adults, name labels shine in the kitchen. Mark containers with ingredients or use them for meal prep portions. This makes cooking a breeze during busy weekdays.
In your home office, add labels to files and storage bins. A clearly labeled system enhances productivity while minimizing distractions.
Don’t forget about seasonal decorations! Use name labels to identify where each item belongs after the holidays—no more hunting through boxes next year!
Whether at home or out and about, creativity knows no bounds when it comes to utilizing name labels effectively.
How to make DIY name labels at home
Creating your own name labels at home can be a fun and cost-effective way to stay organized. You don’t need fancy equipment or materials; just some basic supplies will suffice.
Start by gathering what you need: adhesive label sheets, scissors, and a printer. If you prefer more creative options, consider using plain paper and decorative tape for added flair. You can also use markers or colored pens if you’re feeling artistic.
Next, design your labels on your computer. Use software like Word or Canva to create templates that suit your style. Include names, icons, or even colors that represent the items they’re meant for—this adds a personal touch while enhancing functionality.
Once you’ve printed out the designs on adhesive sheets, cut them out carefully. Make sure to leave enough space around the text so it looks neat when applied. If you’re using plain paper instead of adhesive sheets, simply attach them with decorative tape.
Stick your newly created name labels onto various items such as lunchboxes, storage bins, bookshelves—or wherever you find clutter creeping in! Not only do these DIY labels help in identifying personal belongings quickly but also add an element of creativity to organizing spaces.
So roll up those sleeves and get started on making custom name labels that reflect both practicality and personality!


